

How to Draw Eyelashes. Many artists will tell you that the human eye is one of the most difficult facial elements to draw. This may seem surprising as we see eyes all the time!
Also, check our cat coloring pages printable on our Official Website, The Soft Roots.
They can be more difficult because you need to make your eyebrows, lids, and lashes look realistic.
If eyelashes are the element you struggle with the most, you’ve probably wondered how you could ever learn to draw them. If that sounds like you, then we made this guide for you!
How to Draw Eyelashes
Step 1
Let’s start by drawing a rough guide shape to simplify this eyelash drawing guide.
To do this, you should use a light pencil since you will have to erase it later. You can use the final image in this guide as a reference to pencil the shape of an eye.
After drawing it, you can start with the first step.
For penciled instructions, use a much darker pen or pencil to draw two lines on the top line of your instructions.
As you can see in the reference image, they should be almost touching but with a small gap in between. The left line should also be slightly thinner than the right.
Step 2
You can add more edges to the lash design with your pencil guide.
This fringe comes down from the right corner of the eye and extends to just above the middle.
Once this line is entered, you can proceed to step 3.
Step 3
You can’t have eyelashes without eyelash hairs, so for this step in our eyelash drawing guide, let’s start by adding some of those hairs.
To do this, draw slightly curved lines from the eye contour’s upper left side.
Step 4
Now that you’ve drawn some hair, adding more to the lash design should be easier.
Using a few smaller, thinner lines, move across the eye from the previous hair you drew. As you can see in the reference image, these hairs are small and stand at certain angles.
Step 5
In this next step, we will finish the top row of eyelash hairs. These continue from the last ones drawn but are a bit longer and more substantial.
These hairs also stay more or less at the same angle as they run along.
Step 6
The top half of the eyelash drawing is now complete, meaning it’s time to draw some eyelashes on the underside of the eye.
These are a little thicker and longer than the ones above, and the reference image gives you an idea of what angle they should be at.
As you move further to the left, as you draw the hair at the edge, it should get smaller and further apart.
Step 7
In this step of our eyelash drawing guide, you’ll see why drawing in the form of a pencil guide was a good idea!
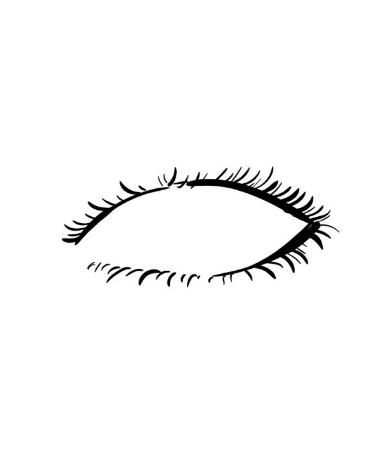
We’re not going to draw the bottom left edge of the eye, so the guide shape will help you place the trailing hairs properly.
These hairs are also slightly smaller and further apart as they extend along the bottom edge of the eye.
As you can see in the picture, you can add a few more hairs to the previous sections of the lash design to make it look fuller.
Once you’re comfortable with how it looks, you can erase the pencil guide you drew in step 1. Let the ink dry before erasing if you used a pen for the final drawing. Otherwise, it might smudge!
Read More: How to Draw a Kraken A Step-by-Step Manual
Step 8
We’re now at step 8, and since you’ve reached that final step, you’ve drawn eyelashes!
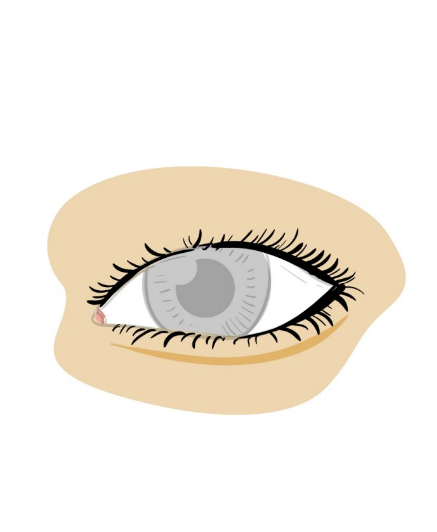
However, you still need to finish your drawing, as you will need some colors to finish your drawing.
You can draw an eye inside the eyelash shape if you’re more creative. The reference image shows you one way to do this.
When you draw the eye, you can color it to match yours and color the lashes too!
Once you’ve decided on the colors, you can play with different artistic means.
I would use some nice watercolors to give the whole thing a softer look, but you should use one of your favorite art tools to finish the lash design!
Your Eyelashes Drawing is Finished!